
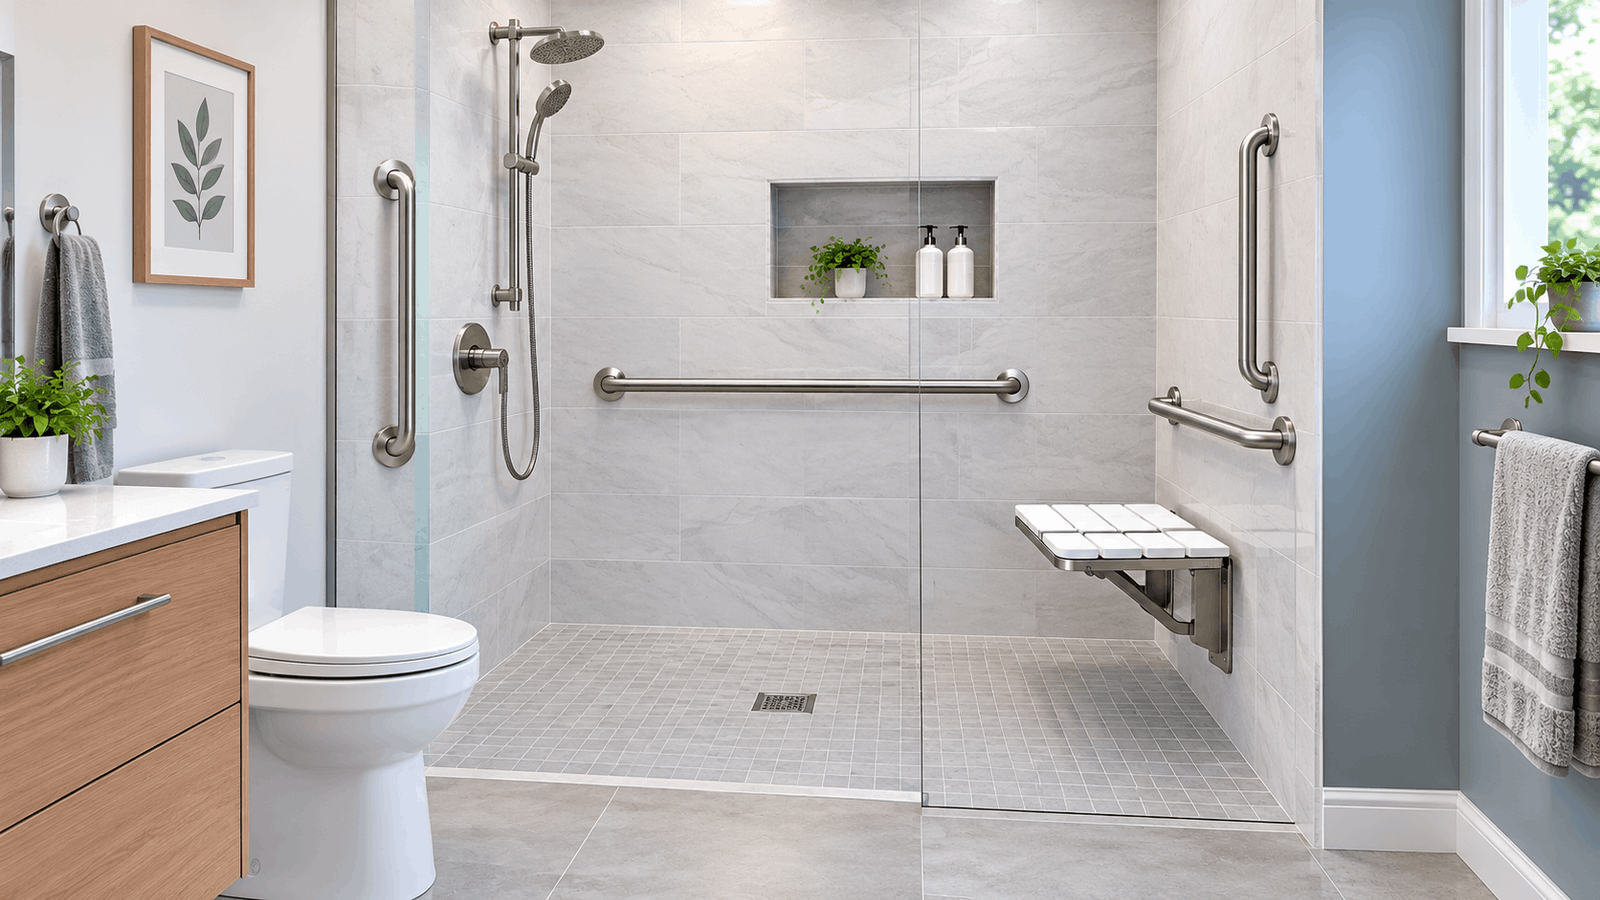
The tile goes up this week, the walls are still open, and you just found out the blocking for your grab bars has to go in before anything gets closed up. That is a stressful place to be standing—so here are the exact positions, heights, and lengths for every bar in a walk-in shower, in the order you will install them.
Quick Answer: In a walk-in shower, place four bars: a vertical bar at the entry, a horizontal bar 33–36 inches above the floor on the wall you face while washing, a horizontal bar on the back wall, and a vertical bar about 18 inches out from the back wall beside any built-in seat.
Table of Contents
What You Need to Know
- Height is fixed; position is not. The 33–36 inch mounting height applies to every horizontal bar; where the bar sits left-to-right depends on your shower’s entry, valve, and seat.
- Walk-in showers create a problem: tubs do not—a glass-panel entry with no wall to mount into. You relocate the bar or add a knee wall. You never drill glass.
- A bar is only as strong as what is behind it. ADA Standards require grab bars to withstand a 250-pound load, which means solid blocking or a stud, not drywall anchors.
- Bar count scales with stall size: two bars in a 36-inch stall, three at 48 inches, and four in a 60-inch or curbless shower.
- Residential bathrooms are not legally required to meet ADA specifications, but ADA numbers are the tested reference every accessible-design professional builds to.
Where to Place Grab Bars in a Walk-In Shower
A walk-in shower needs support at four distinct moments: stepping in, standing at the controls, turning to rinse, and sitting or standing at a seat. Each moment gets its own bar.
- The entry—vertical bar. Mounted on the wall or knee wall nearest the step-in point, reachable before your foot crosses onto the wet floor. This is the bar people use most and install least.
- The control wall—horizontal bar. On the wall holding your valve and showerhead, positioned so you can reach it while standing at the controls without leaning or twisting.
- The back wall—horizontal bar. Supports you while turning, rinsing, washing your feet, or reaching for a shelf. In a wide stall this is the bar that keeps a turn from becoming a stumble.
- The seat zone—vertical bar. Beside a built-in bench or fold-down seat, roughly 18 inches out from the back wall, so you have something to pull against when standing up.
According to the CDC, about 1 in 4 adults aged 65 and older falls each year, and the bathroom is one of the highest-risk rooms in the house. The four-zone layout above covers the movements where those falls actually happen.
Walk-In Shower Grab Bar Placement Chart
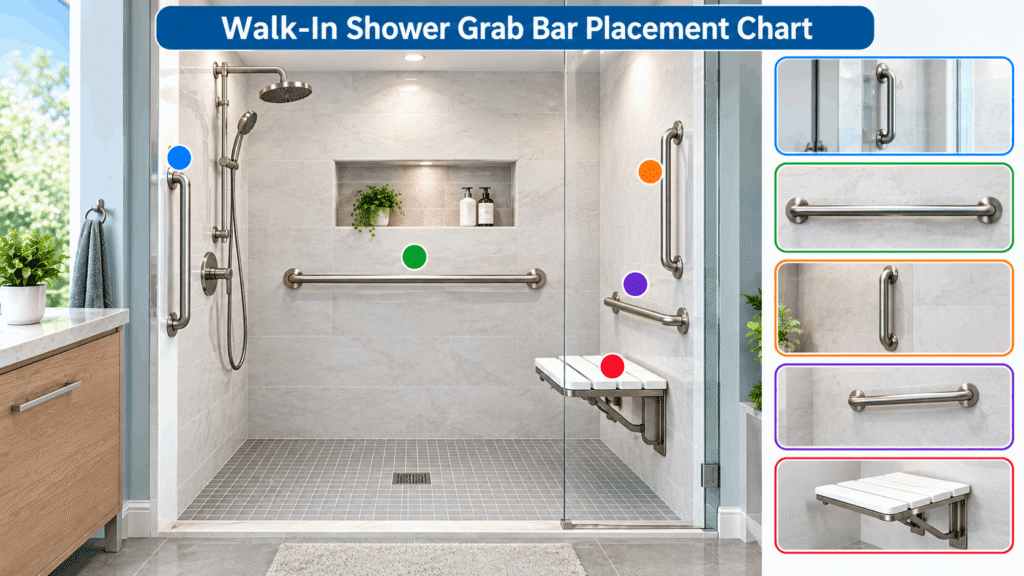
This is the reference table competitors publish as an image—here it is as text, so you can copy the numbers straight onto your wall.
ZoneOrientationHeight above finished floor Typical length placement note: Entry vertical bottom end 39–41 Horizontal 33–3618–24 wall: Horizontal 33–36 mounted on the vertical wall closest to the step-in point. ADA has no vertical-bar rule for showers, so this range is adapted from the ADA bathtub standard. Control / side wall Horizontal 33–36 in. to top of gripping surface 24–32 in. Reachable while standing at the valve. Keep it clear of the showerhead arm and any niche. Back wall: Horizontal 33–36 in. to top of gripping surface 24–36 in. Runs the usable width of the wall you turn against. Do not run it above a seat. Seat zone vertical fitted to the user; top reachable while seated 18–24 in. About 18 in. out from the back wall, on the side wall beside the seat. Glass-panel entry (no wall) Vertical, relocated Same 39–41 in. reference 18–24 in. Move to the nearest framed wall or build a knee wall. Glass is never a mounting surface.
Universal specs, every bar: 1¼–2 inch outside diameter, 1½ inches of clearance between bar and wall, and a minimum of 12 inches of clear space above the bar to the nearest obstruction. Those figures come from the U.S. Access Board’s ADA Standards, Chapter 6{target=”_blank”}.
Save or screenshot this Walk-In Shower Grab Bar Placement Chart—it covers every bar position, height, and length you need before the tile goes on.
If you want the printable one-page version to hand to your installer, that is what we send new subscribers—one measurement sheet, no fluff. [EMAIL CAPTURE POINT]
What If There’s No Wall to Mount Into?
Curbless and frameless walk-in showers frequently have no solid entry wall at all—just a fixed glass panel—and that is the single biggest placement problem this shower type creates.
You have three real options, in order of preference:
- Relocate the bar to the nearest framed wall. Usually the control wall. You lose the ideal entry position but keep a real anchor.
- Add a knee wall (pony wall) during construction. A 36–42 inch half-wall at the shower opening gives you a mounting surface, a place for a niche, and a splash barrier. This is the fix worth asking for while the walls are open.
- Move the support outside the shower. A vertical bar on the adjacent bathroom wall, positioned within reach of the opening, still supports the step-in.
Do not drill tempered glass. It cannot be cut or drilled after tempering, and a panel with a hole in it is a panel waiting to shatter.
Where Does the Bar Go Next to a Shower Bench?
The grab bar goes beside the seat, not above it. ADA Standards keep grab bars off the wall directly above a shower seat, because a bar overhead pulls your shoulder into a weak position instead of giving you something to pull down against.
Run the numbers for a typical seated transfer:
- A compliant shower seat sits 17–19 inches above the floor.
- A horizontal grab bar sits 33–36 inches above the floor.
- That leaves a vertical gap of roughly 14–19 inches between the seat surface and the bar.
You will see “mount the bar 9 inches above the seat” repeated on contractor blogs. The ADA math does not produce that number, and a bar that low is hard to grip from standing. Use the 33–36 inch height and let the gap land where it lands.
The vertical assist bar goes on the side wall, about 18 inches out from the back wall, so a seated user can reach it without twisting. If you are also planning storage in this zone, a combined grab bar and shelf unit keeps the back wall from getting crowded.
Should Grab Bars Be Vertical, Horizontal, or Angled?
Here is the counterintuitive part: a horizontal bar is the worst thing to grab during an actual slip. A hand closing on a horizontal bar slides along it. A hand closing on a vertical bar forms a locked grip that resists a downward pull. That is precisely why the entry bar—the one covering the moment falls—is vertical.
Orientation: Best for where it belongs Vertical stopping a slip, seat. Horizontal: steadying over a curb, sitting down and standing up entry point, beside a seat Horizontal steady balance while already standing, shifting position, turning control wall, back wall Angled (diagonal) Sit-to-stand, where hand height changes through the movement Beside a seat, as an alternative to a vertical bar
Angled bars work because your grip point moves up the bar as your body rises. The trade-off is that they take more wall space and are harder to place in a narrow stall.
How Many Grab Bars Does a Walk-In Shower Need?
Bar count is a function of floor area, not preference—a bigger shower means more steps taken unsupported.
Shower footprint: BarsLayout36 x 36 in. (transfer size) 2 vertical entry bars + horizontal control-wall bar 48 x 36 in. 3A dd a back-wall horizontal bar 60 x 36 in. or larger 4A, add a seat-zone vertical bar Curbless/roll-in: 4+ zones minimum; continuous support along the longest wall
One bar in a large walk-in shower gives false confidence. If someone has to take two unsupported steps to reach the only bar in the room, the bar is not doing its job.
Mounting Basics: Studs, Height, and Weight Capacity
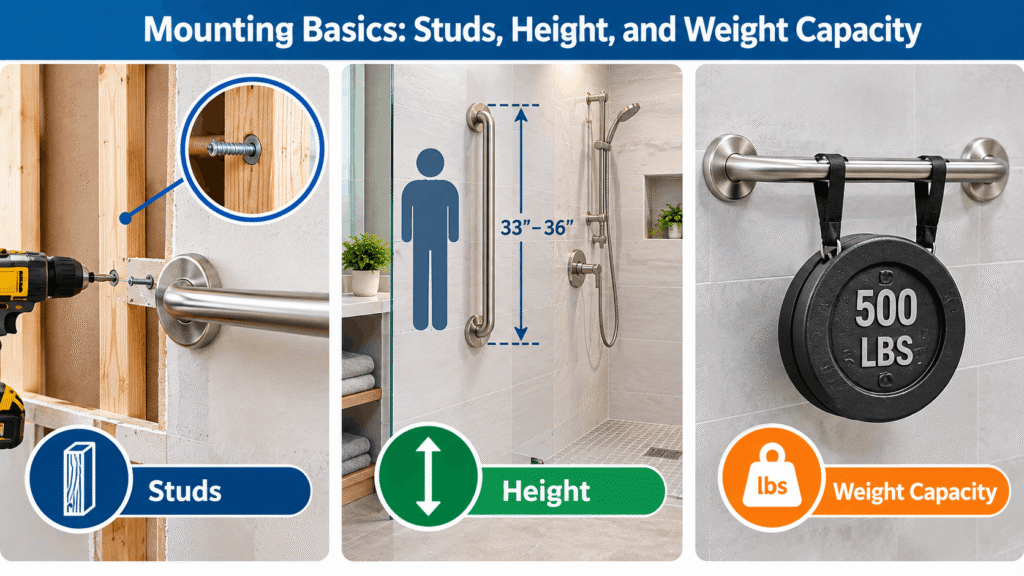
A grab bar transfers a person’s entire body weight into the wall framing, so the anchor matters more than the bar. Work through these steps in order.
- Locate the framing. Wall studs sit 16 inches on center in most homes and 24 inches on center in some newer builds. Use a stud finder and confirm with a small test hole in an area that will be covered.
- Add blocking before the walls close. Install 2×8 or 2×10 horizontal blocking between studs across the full 33–36 inch band, plus the entry and seat zones. This is the single step you cannot do later without demolition.
- Set the height to the gripping surface. The 33–36 inch measurement is to the top of the bar, not the mounting flange. Getting this wrong by an inch is common.
- Check both clearances. Leave 1½ inches between the bar and the wall and 12 inches of clear space above the bar. A bar tucked directly under a shower niche fails this second rule even at a perfect height.
- Confirm the strength rating. ADA Standards require grab bars to withstand a 250-pound load. Note that this is a static load test, not a fall-arrest rating—a falling body generates forces well above its own weight, which is why 500-pound-rated bars exist.
- Seal every penetration. Silicone at each fastener where it passes through the tile and the waterproofing membrane. An unsealed grab bar screw is a slow leak inside a finished wall.
For the full height reference across bar types and users, see our complete ADA grab bar height chart.
Common Grab Bar Placement Mistakes to Avoid
The mistake reported most often in remodeling and aging-in-place forums is not a wrong height—it is a bar anchored into drywall alone.
- Drywall anchors instead of studs or blocking. Toggle bolts and hollow-wall anchors are rated for static loads like shelving, not for a person’s full weight arriving suddenly.
- Using a towel bar as a grab bar. Towel bars carry a few pounds of wet cotton. They are not weight-rated, and they pull out of the wall.
- Mounting under a niche or shelf. Violates the 12-inch overhead clearance rule and traps your hand.
- Skipping the entry bar. The step across a wet threshold is the highest-risk movement in the shower, and it is the bar most often left out.
- Buying decorative hardware that only looks like a grab bar. If the packaging does not state a weight rating, it is not a safety device.
- Placing every bar at the same height for a household with different-sized users. Fit the entry and seat bars to the primary user; keep horizontal bars at 33–36 inches.
- Closing the walls before deciding. Blocking costs almost nothing during framing and several hundred dollars in demolition afterward.
If you are placing bars at the tub or toilet as well, our guide to where grab bars go throughout a bathroom covers those positions.
When to Call a Professional Instead
Placement guidance like this gets you to a solid default layout. It cannot assess one specific person’s reach, grip strength, or balance.
Bring in a professional when:
- The shower is already tiled. Locating studs and blocking behind tile and a waterproofing membrane without cracking either is a specialist job.
- The entry is frameless glass. A glazier or remodeler needs to design the mounting surface.
- The user has had a fall, a stroke, or joint replacement surgery. An occupational therapist can run a home safety evaluation and specify bar positions for that person’s actual movement pattern—often different from the standard layout.
- Your local code may apply. Residential grab bars are generally not mandated, but requirements vary. Check your jurisdiction’s adoption of the International Residential Code {target=”_blank”} before a permitted remodel.
Frequently Asked Questions
Is there a walk-in shower grab bar placement diagram?
The placement chart above works as a text diagram you can copy directly onto your wall. Mark four zones: a vertical bar at the entry with its bottom end 39–41 inches above the floor, a horizontal bar 33–36 inches high on the control wall, a matching horizontal bar on the back wall, and a vertical bar 18 inches out from the back wall beside any seat.
Where should grab bars be placed in a walk-in shower for elderly users?
Older adults benefit from the standard four-zone layout plus support outside the shower—beside the toilet, near the vanity, and along the path to the door. Fit the entry bar to the user’s actual reach rather than a chart, and add a seat so showering does not require standing throughout. Our room-by-room placement guide for elderly users covers the full bathroom.
How high should a grab bar be in a walk-in shower?
Horizontal grab bars mount 33–36 inches above the finished floor, measured to the top of the gripping surface rather than the mounting flange. This range comes from the ADA Standards and is the reference used in residential installations too. Vertical entry bars follow a different reference, with the bottom end at 39–41 inches, adapted from the ADA bathtub specification.
How many grab bars does a walk-in shower need?
Two bars in a 36 x 36 inch stall, three in a 48-inch shower, and four in a 60-inch or curbless shower. The rule behind those numbers is that no one should have to take an unsupported step to reach the next bar. A large walk-in shower with a single bar offers less protection than a small one with two well-placed bars.
Can you install a grab bar on a glass shower wall?
No. Tempered glass cannot be drilled after manufacturing, and a hole compromises the panel’s structural integrity. If your walk-in shower has a frameless glass entry, relocate the bar to the nearest framed wall, add a knee wall during construction, or mount a vertical bar on the adjacent bathroom wall within reach of the opening.
Do grab bars have to be installed into studs?
Yes, into studs or into solid blocking added between studs. ADA Standards require a grab bar to withstand a 250-pound load, and drywall anchors are not rated for that kind of sudden, off-axis force. If the walls are open during a remodel, install 2×8 or 2×10 blocking across the entire 33–36 inch band so bar positions can be adjusted later.
Should a shower grab bar be vertical or horizontal?
Both, in different places. Vertical bars belong at the entry and beside a seat because a closed vertical grip resists a downward pull. Horizontal bars belong on the control wall and back wall, where the job is steady balance while already standing. An angled bar is a reasonable substitute for a vertical seat bar, since your grip point rises with your body.
What to Do Next
You have the positions. Two things typically come next:
- Confirm the exact heights for every bar type in your bathroom with our standard grab bar height chart before you mark the walls.
- Extend the plan past the shower using our guide to grab bar placement at the tub and toilet, since the shower is rarely the only risk point in the room.
- Choose the actual hardware. [CONTENT GAP: no grab bar buying guide / product comparison page exists yet—this is where the commercial bridge link belongs once that page is published.]