
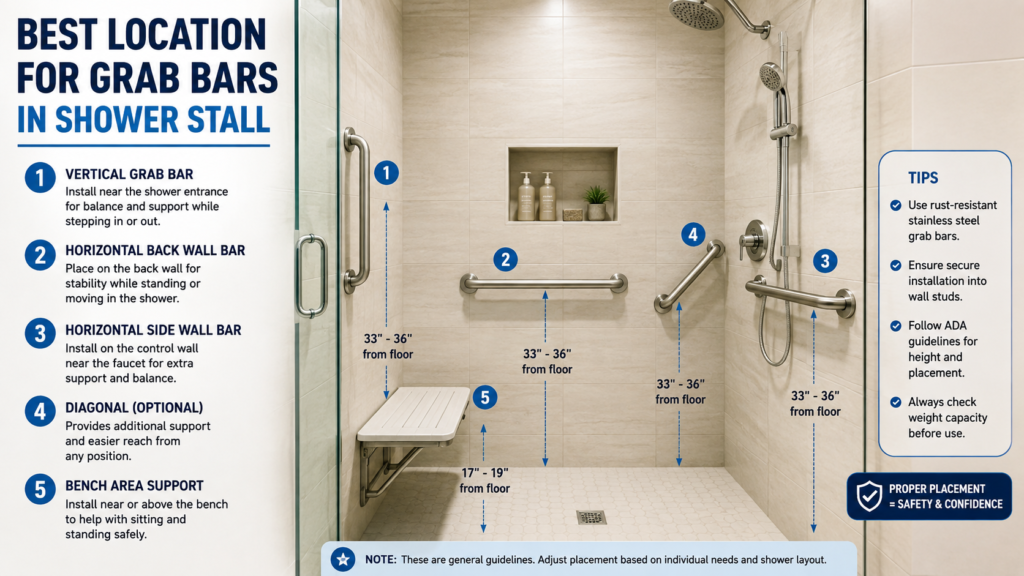
You know a grab bar would make the shower safer, but the hard part is deciding which wall, how high, and which direction to install it. The right placement depends on the movements that need support, the shower layout, and the wall structure—not simply the empty space that looks convenient.
Quick Answer: The best grab bar locations are usually near the shower entrance for transition support, on the side or back wall for standing stability, and near a shower seat when transfers are needed. For applicable ADA installations, horizontal grab bars are generally positioned 33–36 inches above the finished floor, but residential placement should also account for the user’s reach and shower layout.
Table of Contents
What You Need to Know
- Entry bars help with stepping into and out of the shower, often using a vertical orientation.
- Side or back-wall bars provide standing and balance support, commonly with a horizontal orientation.
- A shower seat changes the placement plan because sitting and standing require transfer support.
- The 33–36-inch ADA measurement applies to applicable accessible installations, not automatically to every private residential shower.
- A strong mounting location matters as much as the visible position because a grab bar must be securely supported.
Where Should Grab Bars Go in a Shower Stall?
The best shower grab bar placement supports the moments when you enter, exit, stand, turn, sit, or reach. A practical shower may need one bar, two bars, or several depending on the user’s movements and the shower configuration.
Start with these four zones:
- Shower entrance: A vertical bar can provide support during the step or transition into the shower.
- Side or back wall: A horizontal bar can provide support while standing, turning, and washing.
- Shower-seat area: A bar can help with sitting down and standing up.
- Control area: A strategically placed bar can provide stability while reaching toward controls.
The surprising part is that the most convenient-looking wall is not necessarily the best wall. The useful location is the one that gives the user’s hand support during an actual movement.
The Best Shower Grab Bar Locations at a Glance
Use the shower layout and the user’s movements together rather than choosing a location by appearance alone.
Shower situation: priority location Typical orientation’s main purpose Entering or exiting Near the shower entrance, vertical Transition support, standing, and washing Side or back wall Horizontal balance and stability Using a shower seat Beside or near a seat Diagonal or appropriate transfer configuration Sitting and standing Reaching controls near the control area Depends on layout Stable reach, larger shower Multiple useful zones Mixed continuous support Walk-in shower Entry plus main standing zone Mixed entry and stability
Save or screenshot this shower grab bar placement reference chart—it covers the main shower situations and the support zones each situation requires.
Where Should a Grab Bar Go Near the Shower Entrance?
A grab bar near the shower entrance should support the transition between standing outside the shower and standing inside it. A vertical bar is often useful because the hand can grip at different heights during the transition.
Think about the movement before choosing the exact position.
If the user steps over a threshold, the bar should be positioned where the hand naturally reaches before, during, and immediately after the step. The door or shower enclosure should not obstruct the grip.
For a walk-in shower, the entrance remains important even when there is no threshold because the user still changes position while entering.
Vertical Grab Bar for Entry and Exit
A vertical orientation can provide a range of hand positions during entry and exit. The exact height and distance from the opening should be adapted to the user’s reach and the shower configuration.
Do not position the bar simply because a particular section of tile is available.
Where Should a Grab Bar Go on the Side or Back Wall?
A side or back-wall grab bar is primarily useful for stability while the user is standing, turning, or moving inside the shower. A horizontal bar is commonly suited to this type of support.
The better wall depends on the showerhead, controls, door, seat, plumbing, and the user’s normal standing position.
A long horizontal bar may provide support across more of the standing area, but the final dimensions should match the applicable standard and the user’s needs.
Where Should Grab Bars Go Near a Shower Seat?
A shower seat requires placement that supports both sitting down and getting back up. The bar should be positioned so the user can maintain a secure handhold during the transfer rather than reaching awkwardly across the seat.
A diagonal grab bar can sometimes suit a transfer movement because the hand travels through changing heights while the user sits or stands.
Do not allow the grab bar to interfere with the seat, arm movement, shower controls, or the user’s ability to enter and leave the seated position.
Where Should a Grab Bar Go Near the Shower Controls?
A grab bar near shower controls can provide stability when the user reaches for or adjusts the controls. This location is useful only when the bar can be installed without creating an obstruction or unsafe reach.
The controls should remain easy to operate without forcing the user to lean excessively.
If the control wall contains plumbing or another obstruction, do not drill simply to achieve a preferred visual arrangement. The structural and mechanical conditions of the wall must be checked first.
How High Should a Shower Grab Bar Be?
For applicable ADA installations, horizontal grab bars are generally positioned with the top of the gripping surface 33–36 inches above the finished floor. Residential shower placement can require a different practical fit because the user’s height, reach, movement, and shower configuration also matter.
The official 2010 ADA Standards for Accessible Design specify the 33–36-inch range for applicable accessible grab-bar installations.
Does the User’s Height Change Placement?
Yes. A grab bar should be usable by the person who actually needs it.
A measurement that works well for one person may feel too high or too low for another. The user’s natural hand position during entry, standing, turning, and sitting should therefore be considered before drilling.
For a detailed discussion of measurements, see What Height Is a Shower Grab Bar? 7 Essential ADA Rules You Must Know.
What About Shower Grab Bar Height for an Elderly User?
Age alone does not establish one universal grab-bar height. The better approach is to consider the user’s height, reach, balance needs, and the movements that require assistance.
For an elderly user, placement should make the handhold available during entry, standing, turning, and exiting without requiring an unstable reach. If accessibility compliance is required, use the applicable ADA requirements rather than relying only on general residential advice.
Should a Shower Grab Bar Be Horizontal, Vertical, or Diagonal?
Horizontal, vertical, and diagonal grab bars can serve different movements, so orientation should follow the user’s task rather than a one-size-fits-all rule.
Orientation: Common use, main movement, vertical Shower entrance stepping and horizontal transition Side/back wall Standing and balancing diagonally Near some shower seats Sitting and standing Mixed or complex showers Multiple movements
A vertical bar is not automatically safer than a horizontal bar, and a horizontal bar is not automatically better for every shower.
The user’s hand path is the deciding factor.
Where Should Grab Bars Go in a Walk-In Shower?
A walk-in shower commonly benefits from support at the entrance and another useful location in the primary standing or transfer area. The final arrangement depends on whether the shower has a seat, controls, enclosure, and threshold.
For a basic walk-in shower without a seat, consider:
- entry/exit support
- standing support on a side or back wall
- stable access to controls
For a walk-in shower with a seat, add the transfer movement to the planning process.
Your existing article Grab Bar for a Fiberglass Shower: 2 Proven Methods That Work is the logical next resource if the walk-in shower has fiberglass walls and you need to determine how secure mounting can be achieved.
How Many Grab Bars Do You Need?
There is no single number of grab bars that fits every shower. The number should reflect the important movements that require stable support.
A simple shower may need support at the entrance and standing area. A shower with a seat may need additional transfer support.
Use this planning rule:
- Identify the first movement that feels unstable.
- Identify the second movement that needs support.
- Check whether one bar can safely serve both movements.
- Add another support point when one bar leaves an important movement unsupported.
This approach is more useful than automatically choosing a fixed number.
Does ADA Shower Grab Bar Placement Apply to a Residential Shower?
ADA requirements should not automatically be treated as mandatory for every private residential shower. The 2010 ADA Standards apply to covered facilities and contain requirements for specific accessible shower configurations, along with residential exceptions.
The official ADA Standards include requirements for transfer-type and roll-in showers, grab bar dimensions, locations, and structural strength.
For a private home, ADA measurements can still be useful reference points, but local building requirements and the user’s actual needs may also matter.
What Does the ADA Say About Grab-Bar Height?
For applicable accessible installations, the horizontal gripping surface is generally 33–36 inches above the finished floor.
The ADA also addresses grab bar size, clearance, and structural strength. Those requirements should be evaluated together rather than treating height as the only compliance measurement.
Can You Put a Grab Bar Anywhere on the Shower Wall?
No. A convenient-looking location is not automatically a safe installation location. The wall must be capable of supporting the grab bar, and plumbing, electrical components, doors, seats, and other obstacles must also be considered.
A grab bar is different from a decorative bathroom accessory because the user may put substantial force on it during a transfer.
For a fiberglass shower, wall construction is especially relevant. A suitable placement plan may need a different installation method depending on whether structural support is available behind the shower wall.
How Can You Choose the Best Location Before Drilling?
The safest planning method is to identify the user’s actual movement first and the drilling location second.
1. Identify the difficult movement.
Write down the exact point where support is needed: entering, exiting, standing, turning, sitting, standing from a seat, or reaching.
Do not start by choosing a bar length.
2. Mark the natural hand position.
Have the user stand outside and inside the shower and identify where the hand naturally reaches for support.
Use temporary removable markers rather than drilling immediately.
3. Simulate the movement
Have the user carefully rehearse the movement without depending on the future grab bar.
Check the hand path during entry, exit, turning, and transfers.
4. Check the surrounding clearance.
Allow room for the hand, arm, shower door, seat, and controls.
A grab bar that creates interference can solve one problem while creating another.
5. Verify the wall structure
Locate suitable structural support before drilling.
For uncertain wall construction, especially fiberglass or other shower surrounds, a qualified installer can determine the appropriate mounting method.
6. Check applicable standards.
If the project requires ADA compliance, compare the complete installation against the applicable ADA provisions rather than checking height alone.
The ADA Standards for Accessible Design are the appropriate authority for federal ADA requirements.
What Equipment Should You Choose for the Installation?
Once the location has been established, the grab bar itself should match the job: suitable length, usable diameter, appropriate finish, and a mounting system compatible with the wall structure.
A properly rated shower grab bar with secure mounting hardware is the equipment to consider at this stage, not a decorative suction handle intended merely for temporary positioning. [AFFILIATE LINK: product]
The product choice comes after the placement decision. Buying the bar first and then trying to find a convenient place to install it reverses the safer planning process.
Common Mistakes When Placing Shower Grab Bars
Most placement mistakes happen because the bar is positioned for the bathroom rather than for the person’s actual movement.
Mistake 1: Choosing the empty wall
An empty section of tile may look ideal, but the user’s hand may not naturally reach it during the movement that needs support.
Mistake 2: Treating 33–36 inches as a universal residential rule
The 33–36-inch measurement is an ADA requirement for applicable installations. It should not be presented as an automatic requirement for every private home.
Mistake 3: Ignoring wall structure
A correctly positioned bar can still be unsafe if the mounting system is unsuitable for the shower wall.
Mistake 4: Installing only one bar because one bar looks sufficient
Entry, standing, and seated transfers can involve different movements. One location may not address every risk point.
Mistake 5: Forgetting the shower door or seat
A bar can become difficult to use if a door, seat, or other fixture blocks the user’s hand or body movement.
Mistake 6: Choosing orientation by habit
Horizontal is not always better. Vertical and diagonal orientations can serve different movement patterns.
When Should You Ask a Professional?
Professional help is appropriate when the wall structure is uncertain, accessibility compliance is required, or the user has substantial transfer or mobility needs.
Ask for an assessment when:
- The wall construction is unknown.
- structural support cannot be located
- plumbing or electrical components may interfere
- The shower is being designed for accessibility.
- A shower seat and transfer movement are involved.
- The installation must satisfy specific accessibility requirements.
A professional can evaluate the wall, mounting method, and complete shower configuration before permanent drilling.
Frequently Asked Questions
What is the best location for grab bars in a shower stall?
The best location depends on the movement that needs support. A vertical bar near the shower entrance can assist with entry and exit, while a horizontal bar on a side or back wall can support standing and balance. A shower with a seat may need additional transfer support. The final location should also account for wall structure, doors, controls, and the user’s reach.
What is the best location for grab bars in a shower-stall bathroom?
The most useful locations are generally the shower entrance, primary standing area, and, when present, the shower-seat transfer area. Entry support often uses a vertical bar, while standing support commonly uses a horizontal bar. The arrangement should follow the user’s actual movements rather than placing bars only where the wall is convenient to drill.
Where should grab bars be placed in a bathtub?
Bathtub placement differs because the user must manage both the tub entry/exit movement and the transition between standing and sitting. Grab bars may therefore be useful near the tub entrance and along the tub wall, depending on the configuration. Do not apply a shower-stall layout to a bathtub without considering the different transfer movements.
How high should a shower grab bar be for an elderly user?
There is no single height based solely on age. For applicable ADA installations, horizontal grab bars are generally positioned with the top of the gripping surface 33–36 inches above the finished floor. In a private residence, the user’s height, reach, movement, and shower configuration should also be considered.
Where should grab bars go in a walk-in shower?
A walk-in shower commonly needs support near the entrance and in the main standing area. If the shower includes a seat, another support point may be useful for sitting and standing transfers. The orientation can vary: vertical bars often suit transitions, while horizontal bars commonly support standing. Wall structure and shower fixtures must be checked before installation.
Should a shower grab bar be vertical or horizontal?
The best orientation depends on the movement. Vertical bars commonly provide useful hand positioning during entry and exit, while horizontal bars can provide support during standing and movement across the shower. Diagonal bars may suit certain seated-to-standing transfers. The user’s hand path should determine orientation rather than choosing one style for every shower.
Is there a shower grab bar placement diagram?
A placement chart can provide a useful planning reference by showing entry, standing, seat, and control zones together. The reference chart in this article is intended to help identify the appropriate support zone, but it is not an ADA compliance diagram. Exact accessible placement depends on the shower configuration and applicable requirements.
What to Do Next
If you have identified where the grab bar should go, the next question is usually how high it should be. Continue with What Height Is a Shower Grab Bar? 7 Essential ADA Rules You must know for the measurement details.
If you are still deciding the exact height, see How High Should a Shower Grab Bar Be? for another focused explanation of shower-bar height.
If the shower has fiberglass walls, the next practical step is Grab Bar for a Fiberglass Shower: 2 Proven Methods That Work, which addresses mounting considerations after placement has been decided.
If you plan to recommend products through BathReviewHub, the natural commercial path is placement decision → height and installation education → appropriately mounted grab-bar recommendation → product comparison/conversion page.
Email capture point: If you publish a safety-focused newsletter, place the signup after the “What Equipment Should You Choose for the Installation?” section with a promise such as “Get practical bathroom-safety tips, grab-bar guides, and product comparisons delivered when you need them.”